Some links on this page are affiliate links. As an Amazon Associate I earn from qualifying purchases which means, if you choose to make a purchase, I may earn a small commission at no extra cost to you. Read Disclosure.
🤍
Do you crave a zany and imaginative way to make your Christmas tree spookier this year? Great news for people who can’t let Halloween go these DIY Nightmare Before Christmas Jack Skellington Ornaments are the perfect addition for your holiday decor! Transform your festive Christmas tree into a spooky Halloweentown masterpiece. Get your tools ready and let’s commence crafting!
This blog post is about DIY Nightmare Before Christmas Jack Skellington Ornaments.
How To Make Jack’s Face
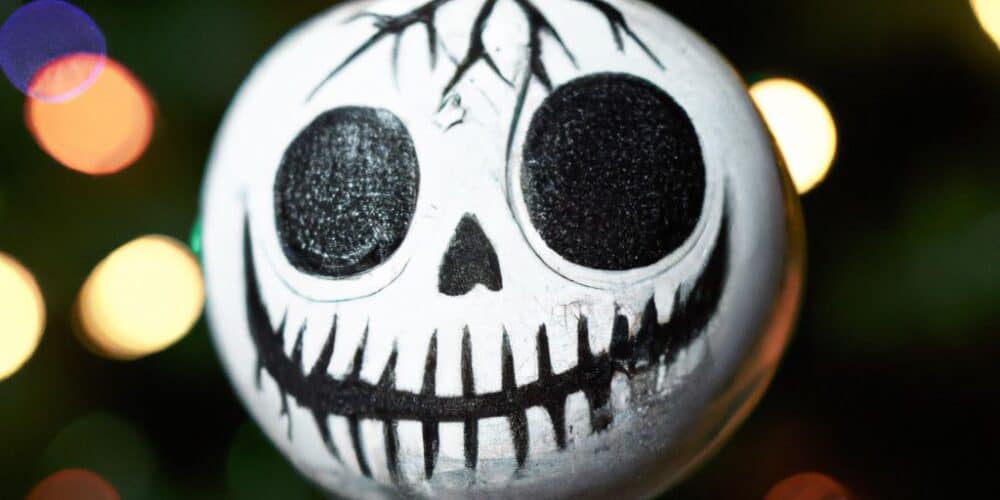
Paint a glass ornament white with acrylic paint. Let it dry. Draw Jack’s eyes, nose, and mouth with a black marker. Add detail with black paint or black vinyl. Create a bow tie with black construction paper or fabric. Attach a loop of black thread or twine to the top of the ornament for hanging.
(Optional) for added spruce try including craft glitter or glow in the dark acrylic paint to brighten the vibe to life.
You’ve created Jack’s face! It’s time to make more Nightmare Before Christmas ornaments. If the back of this one had a face, it’d scream in horror at how cool it looks.
How To Finish The Back Of The Ornament
The reverse side of the ornament is often neglected in DIY projects, but it can provide a chance to add one-of-a-kind details and personalized touches. Here are some ideas for decorating the back of the ornament:
- Take a photo or picture and attach it to the back of the ornament.
- Use black thread or twine to make a decorative blanket stitch around the edges of the ornament.
- With a hot glue gun attach a small bat-shaped bowtie made from either black construction paper or a ribbon to the back of the ornament.
These details will make your DIY Nightmare Before Christmas Jack Skellington ornaments even more special.
Did you know that Tim Burton released The Nightmare Before Christmas in 1993? It has become a well-loved holiday movie. Celebrate both Halloween and Christmas by making your own Jack Skellington ornaments! Get your stitches ready for an Oogie Boogie ornament that will give your Christmas tree a spooky makeover.
DIY Oogie Boogie Ornament
This DIY an Oogie Boogie ornament is the quintessential addition to the nightmare before Christmas family. Follow this simple guide to make this Nightmare Before Christmas character come to life.
- Gather the supplies: Clear glass/plastic ornament, black acrylic paint, small paintbrush, green craft foam.
- Paint the entire surface of the ornament black.
- Cut out Oogie Boogie’s face from the green craft foam.
- Glue the face onto the front of the ornament, centering it.
This spooky ornament will be a stand-out on your Nightmare Before Christmas-themed tree this season! If you’re short on time to go to DIY route then check out Hallmark for their assortment of Nightmare Before Christmas ornaments. They offer licensed ornaments featuring Jack Skellington and Sally.
Frequently Asked Questions
FAQs for DIY Nightmare Before Christmas Jack Skellington Ornaments
1. Can I use any materials to make these ornaments?
Certainly! The great thing about DIY projects is that you can get creative with the materials you use. While the traditional approach involves using clay or polymer clay, you can experiment with other materials like paper mache, felt, or even recycled materials.
2. Do I need any special tools to make these ornaments?
No, you don’t need any specialized tools. Basic crafting supplies like scissors, glue, paint, and brushes will suffice. However, if you want to add intricate details, small sculpting tools or carving knives might come in handy.
3. Is this project suitable for beginners?
Definitely! This DIY project is perfect for beginners. The Jack Skellington ornaments have a simple design that is easy to replicate, and you can adjust the level of difficulty based on your skill level. It’s a great way to start honing your crafting skills.
4. Can I personalize the ornaments?
Absolutely! Adding a personal touch is highly encouraged. Once you complete the basic Jack Skellington design, you can customize the ornaments by painting them in different colors, adding glitter, or even incorporating your own unique design elements.
5. How long does it take to make a Jack Skellington ornament?
The time required to complete an ornament depends on the materials used, your crafting experience, and the level of detail you want to achieve. On average, it can take anywhere from 30 minutes to a couple of hours. Take your time and enjoy the creative process!
6. Where can I display these ornaments?
You can hang the ornaments on your Christmas tree, of course! They also make fantastic decorations for wreaths, garlands, or even as standalone pieces on your mantel or shelves. Let your imagination guide you on where to showcase these spooky yet delightful ornaments!
Amazon and the Amazon logo are trademarks of Amazon.com, Inc, or its affiliates.





Leave a Reply